Showing posts with label Blogger Theme Tutorial. Show all posts

Installing or Changing Blogger Theme - Blogger Theme Tutorial Series - Part 2

on
Thursday, November 18, 2021


This is second part of Blogger Theme Tutorial Series.  The series will cover preparation, installation, and customization tutorial for Blogger or Blogspot Blog. I hope it will provide more clear and up to date guide for themes that i share in this blog.

If you have not read Part 1 about preparation yet, you can click here to read it.

Lets start the tutorial. 

PART 2: INSTALLING NEW THEME

Important !
It’s very important to backup old theme and it’s widgets before installing or modifying anything so you can restore them anytime. 

1. Uploading Theme File

To upload the new theme file:
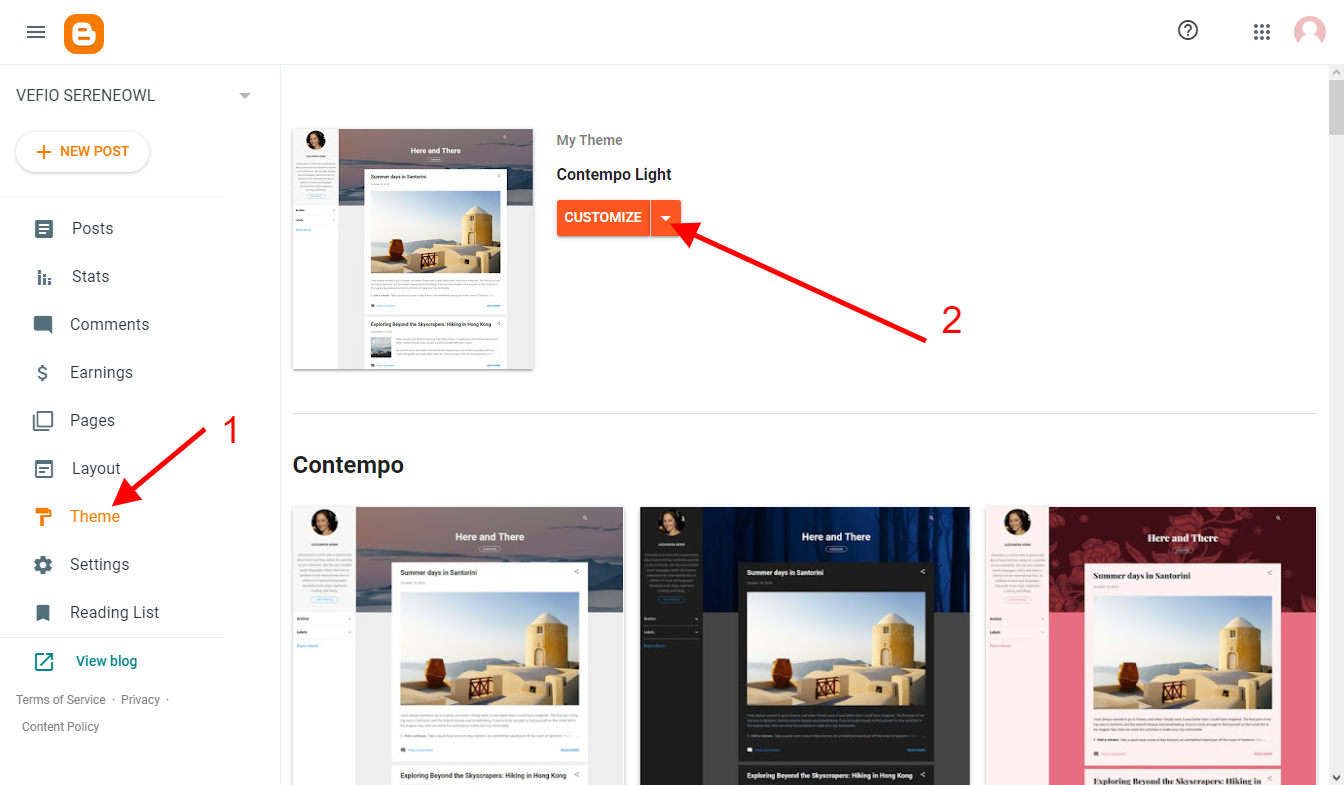
  1. Click "Theme" on the left menu
  2. Click 
    liitle triangle
    liitle triangle beside "CUZTOMIZE" button
  3. After the popup menu showing, click "Restore"
  4. After the small window showing, click "Upload"
  5. Locate and select the theme file (xml file) in the theme package folder. if in your theme package folder there are 2 xml files (autoreadmore and without autoreadmore), you can choose one of them.
  6. Click "Open" Button
Example 1 : Uploading Theme File
Click the picture to enlarge


Example 2 : Uploading Theme File
Click the picture to enlarge


Example 3 : Uploading Theme File
Click the picture to enlarge


Example 4 : Uploading Theme File
Click the picture to enlarge


2. Turning on Responsive Design

To turn on Responsive Design mode, we need to disable default Blogger mobile template:
  1. Click "Theme" on the left menu
  2. Click 
    liitle triangle
    liitle triangle beside "CUZTOMIZE" button
  3. After the popup menu showing, Click "Mobile Settings"
  4. After a small window showing, Choose "Desktop"
  5. Click "Save" Button 
Example 1 : Turning on Responsive Design
Click the picture to enlarge


Example 2 : Turning on Responsive Design
Click the picture to enlarge


Example 3 : Turning on Responsive Design
Click the picture to enlarge


3. Configuring Date Format 

Please do these steps if your posts date got "Undefined" issue. If your posts date is ok, you can choose any date format as you wish.
To configure the date format:
  1. Click "Settings" on the left menu
  2. Scroll down and find "Formatting", and then click "Date Header Format"
  3. after small menu showing, please change so it formated "MM/DD/YYYY" if you got "Undefined" issue, but if your posts date is ok, you can choose any date format as you wish.
  4. Click "Save" button
Example 1 : Configuring Date Format
Click the picture to enlarge


Example 2 : Configuring Date Format
Click the picture to enlarge

Preparation Before Installing - Blogger Theme Tutorial Series - Part 1

on
Monday, November 15, 2021


This is first part of Blogger Theme Tutorial Series. This series will cover preparation, installation, and customization tutorial for Blogger or Blogspot Blog. I hope it will provide more clear and up to date guide for themes that i share in this blog.

Lets start the tutorial. 

PART 1: PREPARATION

1. Backing up Old Theme (IMPORTANT)

Important !
It’s very important to back up old theme and it’s widgets before installing or modifying anything so you can restore them anytime. 
To back up old theme, first please log in to your blogger account :
  1. Click "Theme" on the left menu
  2. Click 
    liitle triangle
    liitle triangle beside "CUZTOMIZE" button
  3. After the popup menu showing, click "Backup"
  4. Save the XML file on your computer 
Example 1 : Backing up Old Theme
Click the picture to enlarge


Example 2 : Backing up Old Theme
Click the picture to enlarge


2. Backing up Old Gadgets

NOTE:  Your Old HTML/JavaScript gadgets and Image Gadgets can affect new Theme, So we need to back up the Old HTML/JavaScript gadgets and Image Gadgets (before removing them), so you can restore them later

Backing up Image Gadgets 


To back up Image gadget is simple:
  1. visit your live blog 
  2. Right-click on your image that you want to back up 
  3. Choose "Save Image As" 
  4. Save it to your computer 
  5. Repeat the steps for another images if necessary
Example 1 : Backing up Old Gadgets
Click the picture to enlarge


Backing up HTML/JavaScript Gadgets 


To back up HTML/JavaScript gadget:
  1. Click "Layout" on the left menu
  2. Decide gadget/widget that you want to backup
  3. On the gadget, Click Pencil icon
  4. After the popup window showing, select (block) Javascript or HTML that you want to backup,then Copy it
  5. Open any plain text editor app (e.g. Notepad, TextEdit)
  6. Paste it into the text editor app, then save the file on your computer.
  7. Repeat the steps for another gadget. 
Example 2 : Backing up Old Gadgets
Click the picture to enlarge

Example 3 : Backing up Old Gadgets
Click the picture to enlarge

Example 4 : Backing up Old Gadgets
Click the picture to enlarge


3. Remove Old Gadgets

NOTE : Your Old HTML/JavaScript gadgets and Image Gadgets can affect new Theme, So please remove Old HTML/JavaScript gadgets and Image Gadgets before installing new theme, but backup them first. 
to backup the gadgets, please see previous section here: Backup Old Gadgets .

To remove a gadget:
  1. Click "Layout" on the left menu
  2. Decide gadget/widget that you want to remove
  3. On the gadget, Click  Pencil icon
  4. After the popup window showing, "Remove" button
  5. Repeat the steps for another gadget. 
Example 1 : Remove Old Gadgets
Click the picture to enlarge

Example 2 : Remove Old Gadgets
Click the picture to enlarge


Click Here to continue to PART 2: Installing Theme